|
The Insta Mark 116
Orders can take up to 4-5 weeks.
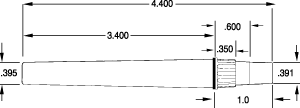
With it's small diameter marking head is very popular for marking custom inspection symbols in all those hard-to-reach places.
The plastic housing, with it's marking head only .370 in diameter, allows the user to mark between components on a stuffed printed circuit board.
In addition, the Insta Mark 116 takes advantage of the micro-pressure adjustment feature so operators can stamp clear, consistent impressions with characters as small as .0525 in height.
The maximum sized mark made with the Insta Mark 116 stamp is 6mm, which is .236 inches.
This stamp maybe used with the Auto Marker

|
Multiple borders to choose from.

Colors Available: Black, Blue, Red, Green, Purple, UV Green and UV Blue.

IMPORTANT NOTE; Stamp comes with a fast drying ink and you will need to order re-inking fluid.
Orders can take up to 4-5 weeks.
Any questions call 714-979-1405 or email us at Sales@HittMarking.com
Insta Mark 116 Re-Inking
Instructions
 1. Remove the cap and the handle portion of the stamp. Next,
remove the pressure adjustment insert. Hold the rubber die
holder in one hand and begin adding IM ink.
2. Add 5-6 drops of Insta Mark 116 ink to the open back of the rubber die
holder. Reassemble stamp by re-inserting the adjustment insert into
the rubber die holder. When reassembling, always return adjustment
insert to the "0-0" position. Test stamp on sample surface to make sure
pressure adjustment insert is positioned correctly. PRESSURE
INSERT SHOULD BE POSITIONED SO THAT STAMP FACE JUST EXCEEDS PLASTIC
CASING. If pressure insert is not adjusted properly your mark can
be very heavy or incomplete.
3. ADJUSTING PRESSURE INSERT FOR HEAVY OR INCOMPLETE MARKS.
For heavy marks adjust one negative (-) increment at a time counter
clockwise. Test after each increment adjustment until stamp face just
exceeds plastic casing and a clear, sharp impression occurs. For light or
incomplete marks adjust one positive (+) increment by turning clockwise
until a clear,sharp impression occurs. If the mark remains light after 15
minutes, re-ink again.
4. Re-Inking Parameters:
The Insta Mark 116 should be re-inked every 1,000 marks or so. It is
important not to run the stamp completely dry. By adding the
appropriate number of drops (5-6) every 1,000 marks you will be able to
keep the stamp moist and in condition to handle high volume marking or long
term storage.